Modeling Plaster Mountains
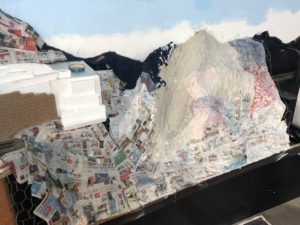
There are two general approaches used in making mountains, hills and valleys. The subtractive process involves stacking foam and then carving and sculpting it into the desired form. The additive process involves creating an armature of either cardboard or wire and then covering with a paper or cloth skin.
The Fitchburg Railroad will have a great deal of terrain, much of which is hiding trackwork. For this reason, the larger areas are using a wire armature that permits a fairly open core for access to track and the ability to properly support bridge piers. While many use the cardboard lattice, it requires more internal supports and is harder to manipulate into more complex forms that can support a heavier weight of cast rocks.
(Stoney Gap – wire armature test area ~9sqft)
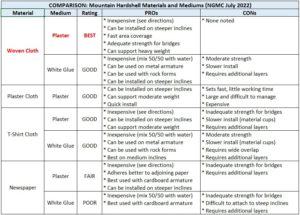
The most common skin used is plaster cloth, but the price of that is fairly high if you have an expansive mountain range to build. When I calculated the overlap and waste, the cost was about $1.70 per square foot. So in the spirit of the 1940s modeling approach (aka using materials at hand), I looked into multiple approaches to include making my own plaster cloth and newspaper. As plaster clothe is made from gauze, t-shirt cloth was tested, but was fussy. The woven cloth (sheet or shirt material) mixed with plaster had the best results and came in at less than $0.10 per square foot. The most surprising trick I learned was vinegar slows the drying process giving much more time to work the material in place. To see more of the Fitchburg Railroad On30 build, visit us on Facebook.
PLASTER MOUNTAIN DIRECTIONS:
Tools: mixing bowl and measuring cup.
Ingredients: plaster of paris (1 cup), water (1 cup), and vinegar (1 tbsp).
Material: cut and old sheet or shirt into 3″ x 8″ pieces; the color of material is irrelevant.
Preparation: cover track and put newspaper or plastic sheeting on floor.
Mixing: add water and vinegar to bowl, shake plaster into water while mixing with hand.
Application: put several pieces of material in mix and pull material between your index and middle finger to remove excess plaster.
Note: a second layer of material can be added or brush on mixture with a paint brush.
Cleanup: bucket of water to wash your hands and tools.
[Update: after writing this article, I discovered a similar method in Model Railroader (Dec ’42) which notes “made of underwear, shirts, flour or grain sacks” that were coated with gesso (recipe of 1 pound powdered chalk to 1 pint of non-waterproof glue). The cloth was supported by crumpled newspaper, which is a method still commonly used with plaster cloth.]


